By Marshall Dickholtz, D.C.
Vol. 2, No. 8, January, 1980
Precisely aligned X-ray equipment and proper patient placement are two essential factors if distortion-controlled upper cervical x-ray films are to be obtained. If either or both of these two factors is lacking, the films cannot be accurately analyzed. Unequal bilateral magnification and improper patient placement ruin precision analysis. Because the adjustment is the synthesis of film analysis, the processes of computing the misalignments of the subluxation so as to establish the force vectors required to correct it, make analytical accuracy vital. Not only must the vertebral misalignments be measured in degrees as to their direction from the normal position but computed as to their comparative relationships into the planes of abnormal motion if the adjustic force vectors are to be determined exactly, and a resultant of forces established that, if acted on, will produce a corrective adjustment.
When an X-ray machine is properly aligned and the patient correctly placed, comparative X-rays can be consistently repeated. Consistent reproduction of X-rays is vital to the subluxation-measurement process. X rays taken to determine the amount of correction of the subluxation after the adjustment (posts) require consistent placement and, of course, exact machine alignment. (See NUCCA X-Ray Alignment Hand book for detailed instructions on how to align X-ray equipment.)
PATIENT PLACEMENT AIDS
Several aids have been developed to assist in placing the patient for the X-ray exposure. Some of these aids have helped reduce exposure time, just as machine alignment has reduced exposure to the patient.
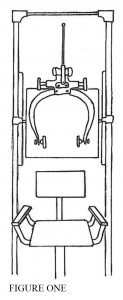
A very important placement aid is the turn-table upon which the chair is securely fastened. (See Figure 1) Because the patient’s head is the constant in the X-ray, it must be exactly centered to the film. No rotation of the head is permissible. If the patient carries his head in a rotated manner, or the head is tilted characteristically, neither must be removed manually by the technician. The head is x-rayed in its characteristic tilt when taking the nasium view, but head rotation is removed by turning the turn-table until the center of the patient’s glabella aligns with the center of the bucky and film. Both head tilt and head rotation are part of the patient’s subluxation and to remove them manually would cause error. The head tilt indicates that the head has abnormally rotated from its true vertical axis, and rotation of the head indicates that misaligned vertebral segments in the cervical spine have caused the head to rotate.
The purpose of the turn-table, therefore, is to enable the technician to move the patient right or left so that the center of his glabella (skull) can easily be aligned to the center of the bucky and film. The turn-table also serves the purpose of rotating the patient’s body to achieve the same objective. It further permits the technician to bring the patient forward or backward in proper proximity to the bucky. The procedure for using the turn-table will be described under patient placement for each type of film: lateral, nasium (A-P), and vertex.
A scissors-type headclamp should be attached to the bucky or gridholder. (See Fig. 1) The headclamp serves as a stabilizer for the patient’s head during the exposure, and is aligned so that, when opened, its center is always central to the center of the bucky. Consequently, the patient’s head can be viewed between the pads of the open clamps and brought equidistant from each pad simply by manipulating the turn-table. Thus the headclamp serves as a centering device, insuring patient head alignment.
Attached to the headclamp is a device called an alignment rod. (See Fig. 1) As the name indicates, the alignment rod is used to align the glabella of the patient’s head to the center of the bucky and film. Another device, developed by NUCCRA, is the plastic alignment mask which supplants the alignment rod. This mask permits the technician to observe several points on the patient’s head from which to align the patient.
Of help in centering patients in the vertex film is the 4″ x 4″ mirror which can be permanently attached to the top and center of the bucky or grid-holder. A center line vertically inscribed through the center of the mirror, which is continuous with the central vertical line of the bucky, allows the technician to view the patient’s glabella as it is reflected in the mirror as he stands behind the patient. The mirror may also be used to reflect the alignment rod or the center line of the plastic mask.
Also used exclusively when taking the vertex film is the NUCCRA chin-centering device. This plastic instrument guides the patient’s chin to the mid-line of the bucky and center of the film at a point about two inches above the horizontal center of the film. The device is secured to the front of the bucky by two small plastic brackets, and it can be quickly removed when taking the lateral or nasium films.
A cord or heavy string at least 42 inches long should be attached to the X-ray tube-head just lateral to the focal spot. This cord represents the true central ray from the focal spot. Its function is to permit the technician to view the path of the central ray from focal spot through the patient and to the desired point on the bucky or film. The cord also helps to determine the position of the tube-head on the tube column when taking any film. By tying a knot in the cord, the required 42 inch focal spot to film distance can be constantly checked. This exact distance is required for all exposures because the NUCCRA analytical instruments are designed to measure X-ray images taken at a 42 inch distance.
ALIGNING THE PATIENT FOR THE 8 X IO LATERAL FILM
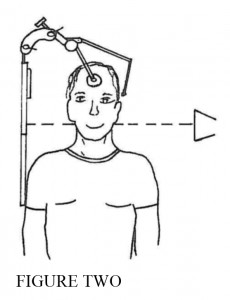 To align the patient for the 8 X 10 lateral film, have the patient sit on the turn-table chair in his naturally erect position. The turn-table is then rotated until the patient’s shoulders are approximately at right angles to the face of the bucky or grid-holder. The angle of the bucky is set parallel to an imaginary vertical line through the patient’s head and neck. The patient’s shoulder rests gently against the face of the bucky at its lower aspect. (See Fig. 2)
The patient is centered to the middle of the bucky (film) by moving the turn-table chair toward the bucky until one shoulder rests against the front of the bucky. The opened headclamps are lowered and placed so that the pads, when closed, will contact the patient’s forehead and upper part of the posterior skull. Any unequal distance between the pads and the head should be eliminated by moving the turn-table chair forward or backward. When the patient is centered to the headclamp pads, the clamps may be closed until the pads rest against the forehead and back of the upper part of the head.
The alignment rod or plastic mask may be brought down over the side of the patient’s head so that any two symmetrical points on the patient’s head can be viewed with the aid of the mirror. If these two points are not directly opposite, the head may be rotated. Open the clamps and turn the turn-table until the opposite points agree. It is well to check the rami of the patient’s jaws to see if they align. When closing the clamp, use care that the patient’s head is not moved during the process. Always be sure when taking an x-ray that the headclamp pads pivot freely to assure firm contact with irregular bone structures.
Position the x-ray tube on the tube column so that the cord representing the central ray will pass through the inferior aspects of the ear-lobes of the patient, and strike the film about oneand-one-half inches above the horizontal bucky line. Thus the central ray is directed from the focal spot through the mark on the tube cone (which sets the tube at its correct height on the tube column) so that it aligns with the atlas. So positioned, all seven cervicals should be clearly seen on the developed film. In rare cases where the patient’s shoulders obscure the lower cervicals, turn the turn-table about 15° to the face of the bucky and take another film.
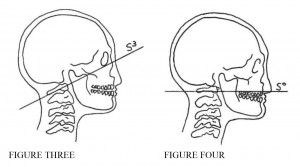 The purposes for which a lateral film is taken include, of course, the existence of and location of pathology, abnormalities, and old fractures. The lateral film is also valuable in determining the amount of abnormal movement of the atlas into the sagittal plane (so-called superiority or inferiority). The sagittal plane movement of atlas is important in x-raying the patient for the nasium. With the nasium exposure, the central ray must be directed through the atlas so that the attachments of its posterior ring to the lateral masses can be clearly seen as they are necessary in determining atlas laterality. The technician must know the plane on which the atlas sets so that he can determine the correct angle of the central ray when taking the nasium. This plane varies in different people (See Figures 3 & 4). The lateral film, therefore, must be developed before taking the nasium film. The plane on which the atlas sets can be determined by placing a ruler through the posterior ring attachments and under the inferior border of the posterior ring. If the lateral film is dry, a line may be drawn through the same points.
For the 150 lb. person, the recommended exposure time for the lateral is 90 K.V.P. at 10 Mas, and ¾ second. (A 90 K.V.P. and 10 Mas is recommended for all cervical films; only the time factor is changed from film to film).
ALIGNING THE PATIENT FOR THE 10 X 12 NASIUM FILM
The patient is directed to sit erect but not rigidly so, and to lower his head and look toward his knees. If the patient’s head is raised, his laterality of atlas may measure less on the nasium film than if his head is lowered slightly. Laterality of atlas may in fact read opposite to its correct side if only measurable to a fraction of a degree. This is important, particularly when taking comparative x-rays.
Having the patient close his eyes while being placed will eliminate the possibility that he is holding his head in an unnatural position, fixing his head position with his vision. In any event, if the head is tilted or rotated do not manually remove either. The head is the constant; to change its position manually is to change the subluxation.
Move the patient toward the bucky by bringing the turn-table chair backward. Tilt the bucky forward so that it contacts the head and at least one shoulder. Raise or lower the bucky until the patient’s atlas is about ½ inch above the horizontal line on the bucky representing the horizontal center of the 10 X 12 film. Bring down the headclamps and visually determine the spaces between the pads and the patient’s head. Move the turn-table chair laterally until these spaces are equalized. Close the headclamps until the pads gently and evenly contact the patient in the transverse area, or low down on the patient’s head, so as not to straighten any head tilt that may be present.
Bring down the alignment rod, or the plastic alignment mask. Check with the center of the patient’s glabella. If using a NUCCA plastic mask, check its center line to the glabella and also note the relation of the curved lines to the lateral aspects of the patient’s head. If the points align, the patient is accurately placed; if the points do not align, check for head rotation and remove it by turning the turn-table. The headclamps must be opened before turning the patient, of course.
When the patient’s head is rotated, it is a better practice to bring the patient forward with the turn-table chair, taking him away from the bucky. Turn the patient’s body with the turntable at the same time easily taking him back to the bucky. Then align his glabella and the center of the back of his head to the center line on the mirror and bucky. Check again the spaces between his head and the headclamp pads. It may be necessary to shift him slightly left or right to equalize the head and pad distances and obtain glabella and back of head alignment to the bucky center line. Close the headclamps and recheck the alignment. If alignment is centered, raise the alignment rod, or plastic mask, out of the x-ray field. After the exposure, it is advisable to lower the alignment rod and recheck alignment to ascertain if patient moved during the exposure.
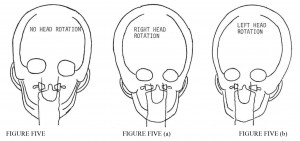 Head rotation is seen on a nasium film by observing the skull thickness, relative position of the orbits to the lateral aspects of the skull, comparing the shape and size of the zygomatic arches, the rami of the mandible to the mastoids, the overshadowing of the nasal septum on the lateral masses, and bilaterally comparing other like points [See Fig. 5, 5(a), and 5(b)].
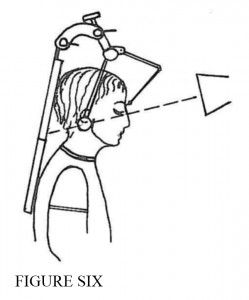 Move the X-ray tube up or down the tube column to the position which agrees with the superiority or inferiority of atlas as shown on the lateral film. In performing this operation, the cord that is attached to the tube-head is brought through the tip of the mastoid process to a point approximately one-half inch above the horizontal center of the 10 X 12 film. The tube-head should be positioned so that the central ray, as represented by the cord, is along a straight line from the focal spot, through the tip of the mastoid, to one-half inch above the horizontal center line of the bucky. (The horizontal line for both the 8 X 10 and the 10 X 12 should show clearly on the bucky face) The X-ray tube head and the cone should be marked so that the cord, as it passes along the side of the tube-head and cone, will indicate the necessary degree for tipping the tube (See Fig. 6).
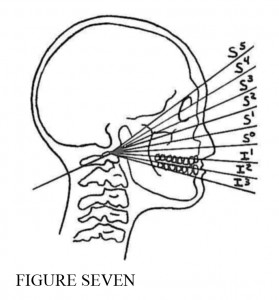 When the central ray bisects the atlas from its anterior tubercle through its posterior tubercle, the attachments of the posterior ring to the lateral masses can be clearly seen on the exposed film. If these attachments are not clear because the central ray was too low, the posterior ring will over shadow the attachments. If the ring is too low, do not attempt to analyse the film. Recheck the plane on which atlas sets by drawing a line along the inferior border of the posterior ring and through the ring’s attachments to the lateral masses, continuing the line through the facial features. The point where the line emits from the facial features will be the entry point for the central ray. Retake the film. Record the degree of angle on the case record card as the post nasium film must be x-rayed through the exact same angle (See Fig. 7).
In rare cases where the atlas is inferior, a cork may be placed between the patient’s front teeth, holding his mouth open so that the X-ray image is not obliterated. In these cases the central ray must pass through the open mouth or the attachments of the posterior ring will be obscure on the film image. The exposure time should be reduced to compensate for the lessened density.
When taking the nasium film, it is advisable to take two films, one with the tube-head (and central ray) raised about three inches higher than its position for the film taken through the true plane of the atlas. A better definition of pertinent structures is obtained and the analysis made more accurate, justifying the practice. The higher exposure will require slightly more time because the ray must pass through the patient’s head more obliquely.
ALIGNING THE PATIENT FOR THE 8 X 10 VERTEX FILM
To take the vertex film requires that the patient face the bucky which is angled forward at an approximate 20° angle. Shift the patient with the turntable chair until the center of his sacrum approximates the center vertical line of the bucky. Have him lean forward from the waist, his head and neck extended, and advise him to look up. If the patient has difficulty in looking upward, or if too much strain is evident, move the turn-table chair as far backward as possible. Guide the patient’s chin until it rests on the vertical center line of the bucky, and at a point two inches above the horizontal center line of the bucky. If a NUCCRA chin-rest is used, simply guide the patient’s chin into the chin-rest where it will automatically center to the film.
Standing on the tum-table platform directly behind the patient, the technician manually removes all tilt from the patient’s head. Accuracy in obtaining a level head can be obtained if the technician compares the patient’s earlobes to the horizontal center line on the bucky. The technician leans over the patient and manually aligns the center of the patient’s glabella with the center line of the mirror. This procedure rules out the possibility of head rotation. The manual aligning of the patient’s head does not change rotation of the atlas in the transverse plane which is the purpose of the vertex film.
After the patient is aligned, bring the headclamp to a point that will permit the pads, when the clamp is closed, to contact the crown of the patient’s head at its posterior. This headclamp position brings a slight forward pressure on the head when the clamp is closed.
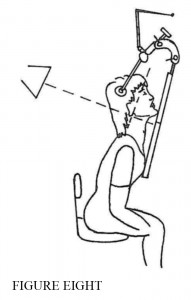 The central ray, as indicated by the cord attached to the tube-head, is directed at right angles through an imaginary line from the superior aspect of the patient’s eye socket to the tip of his transverse process; the central ray bisects the imaginary line at the tip of the transverse process (See Fig. 8). The position of the tube-head (focal spot) on the tube column is determined by the central ray which must pass through the imaginary line at a 90° angle to a point that coincides with the transverse process location. The tubehead must be turned to set the 90° angle.
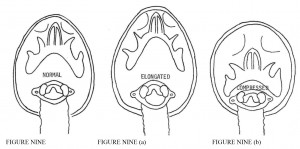
There can be no deviation of the central ray from 90°, either forward or backward. The deviation will distort the image and alter the shape of the transverse foramina of the atlas. These foramina are vital landmarks in computing rotation of atlas into the transverse plane of the body. If the central ray angle is less than 90° an elongated X-ray image will result. If the angle is greater than 90°, the image will be compressed. In either case the patient should be re-x-rayed [See Fig. 9, 9(a), and 9(b)].
Tight collimation should be installed at the port of the X-ray housing and the front of the cone (See MONOGRAPH Vol. 1, No. 2, December, 1973). When using 8 X 10 and 10 X 12 cervical X-rays at a 42 inch focal-spot to film distance, permanent collimation can be used at the port and front of the cone (See MONOGRAPH, Vol. 1, No. 2 for details) All state and federal regulations should be carefully observed.
If the X-rays are hand processed, a full seven minutes developing time at a 68° temperature is advised. Seven minutes is advisable if the exposure time for a 150 lb. person is from ½ to ¾ seconds for the lateral; 2 to 2 ½ seconds for the nasium; and 2 ½ to 3 seconds for the vertex film. By developing the films for a full seven minutes a more detailed film will result. If the films are too black, cut the time of the exposure. It is the final minute in the hand processing developing procedure that brings out the detail in the film that is not over exposed. The lateral film, developed first, will guide the technician in determining the time factor to be used on the successive films.
It is well to remember when aligning patients that less distortion is evident if the bucky is kept as close to a right angle to the central ray as possible. While this ideal situation is not always tenable, it should be observed carefully.
In cases of a loss of calcification, the K.V.P. should be lowered to bring out more detail. For every 10 K.V.P. decrease, double the exposure time.
A properly exposed film will be more gray than black. Black films do not clearly show the pertinent reference points in analyzing the film. Poor collimation will darken the X-ray image, adversely affecting detail. Good collimation requires more exposure time but provides protection for the patient.
In all cases clarity is essential. In cases where pathology should be examined more closely, the patient can be placed flush against the bucky, thus shortening the object to film distance which gives greater detail.
A back scatter shield can be installed on the back of the bucky or grid-holder. This shield is a sheet of onesixteenth inch thick lead mounted directly on the bucky or grid-holder, and it serves to reduce scattered radiation.
Always use a double marking system, one that will clearly indicate the right side of the film. The patient’s name, or case number, placed in a letter-plate which bears the name of the doctor or clinic and the date of the X-ray, should be taped on the front of the bucky. It should read forward, date left, patient’s name right. A large letter “R” or the word “RIGHT” should be permanently taped to the front and side of the cassette. The cassette is always placed in the bucky with the letter “R” or the word “RIGHT” corresponding to the patient’s right side when he is positioned for the exposure. When the X-rays are analyzed, it is a simple matter to double check and avoid serious error, because, when placed in the reading box, the patient’s name on the nasium film should read backward and the letter “R” or the word “RIGHT’ appear on the right side of the film. On the vertex film, the patient’s name will read forward and the letter “R” or the word “RIGHT” will appear on the right side. As cassettes can be incorrectly placed in the bucky, a double marking system is advisable.
CONCLUSION
It is vitally important to the scientific upper cervical practitioner that the patient’s X-rays be clear and detailed, because the force vectors of the adjustment are computed from the films. As NUCCA practices upper cervical, it is a measured process: X ray through adjusting process through the post-X-rays. Each step depends for its accuracy upon the preceding step. Because force is a vector possessing magnitude and direction, adjusting can be dangerous to the patient if the direction of the adjustic force is not correctly computed for any reason. Incorrect film analysis results in wrongly computed force vectors, wrong direction in the adjustment, increased misalignments, and larger subluxations.
For these reasons, NUCCA offers help to the doctor with his X-ray alignment and associated problems. In 1971 NUCCA published an X-ray Alignment Hand book which is available from NUCCA at cost plus handling and mailing charges of $1.00. Members of NUCCA receive a copy without charge, upon request. NUCCA, the fraternal organization, or NUCCRA, the research organization, may be contacted by mail for free advice on all phases of upper cervical practice.


